A common pattern when showing a list on a website is allowing the users to filter it with a search term. So, how do you do this in AngularDart?
In this code tutorial, which uses AngularDart 5.0, we will create a simple web app with a list. Above the list, in a sibling component of the list, we will show an input field and a clear button. As the user types in the input, the list is filtered accordingly. If the user taps the clear button, all the items of the list are shown again and the input field is cleared.
The code is available on github.
Disclaimer: I am new to AngularDart and web apps in general, but I am proficient with Dart. I started using AngularDart a few weeks ago for my 2 job boards, Flutter Jobs and Flexible Tech Jobs in the UK. I am a mobile app developer and used the official online documentation to create those web apps. I have written this tutorial because I struggled to find AngularDart code tutorials. AngularJS tutorials are plentiful, but I’m not proficient with JS and I cannot “translate” from AngularJS to AngularDart easily.
Setting up the web app
Create a web app called AngularDartFilterList. If you’re not sure how to do this, refer to the official doc. By default, an app with a to do list is created.
Firstly, we remove the todo_list folder under lib/src.
Secondly, we create a list folder under lib/src, and add 3 new files to it, for the list component. The files are list_component.css, list_component.dart, and list_component.html.
Thirdly, we create the ListComponent in list_component.dart.
|
1 2 3 4 5 6 7 8 9 10 11 12 13 14 15 16 |
import 'package:angular/angular.dart'; @Component( selector: 'my-list', templateUrl: 'list_component.html', styleUrls: ['list_component.css'], directives: [coreDirectives], ) class ListComponent implements OnInit { ListComponent(); @override void ngOnInit() { } } |
The html in list_component.html is a placeholder for now.
|
1 |
<div>List not implemented yet</div> |
Lastly, we amend app_component.dart and app_component.html to use the ListComponent instead of the TodoListComponent.
|
1 2 3 4 5 6 7 8 9 10 11 12 13 14 15 16 |
import 'package:angular/angular.dart'; import 'package:AngularDartFilterList/src/list/list_component.dart'; // AngularDart info: https://webdev.dartlang.org/angular // Components info: https://webdev.dartlang.org/components @Component( selector: 'my-app', styleUrls: ['app_component.css'], templateUrl: 'app_component.html', directives: [ListComponent], ) class AppComponent { // Nothing here yet. All logic is in ListComponent. } |
|
1 2 3 |
<h1>AngularDartFilterList</h1> <my-list></my-list> |
Getting the list data
In a real app, you would load the data from a backend, using a Service. So we are using the same general architecture here.
However, for simplicity, we use Future.delayed() to simulate a server call, and the data will instead be hardcoded in the Service class.
We start off with creating a new data folder under lib/src. In it, we create item.dart and items_service.dart.
The first file is a basic model for Item, as below.
|
1 2 3 4 5 6 7 8 |
class Item { final String id; final String display; Item(this.id, this.display); } |
The second file is a service to get and store in memory the list of items. For the list of items, I took inspiration from the books I have recently read. You may put your own favourite authors in there 😉
|
1 2 3 4 5 6 7 8 9 10 11 12 13 14 15 16 17 18 19 20 21 22 23 24 25 26 27 28 29 30 31 32 33 34 35 36 37 38 39 40 41 42 43 44 45 46 47 |
import 'package:AngularDartFilterList/src/data/item.dart'; import 'dart:async'; class ItemsService { List<Item> _items; Future<List<Item>> getItems() async { // We return the cached items if available. // In a real world web app, depending on the domain of your web app, // you may want to either invalidate the cache after x minutes (eg for a small merchandise store), // or use a backend with server side events functionality such as Firebase (eg for a chat app) if (_items != null) { return _items; } // Here, we simulate a server call by waiting for 2 seconds... await Future.delayed(Duration(seconds: 2)); _items = _getHardcodedItems(); return _items; } /** * This is for demo only. */ List<Item> _getHardcodedItems() { List<Item> list = List<Item>(); list.add(Item("1", "Charles Dickens")); list.add(Item("2", "Paul Auster")); list.add(Item("3", "Jane Austen")); list.add(Item("4", "H.G. Wells")); list.add(Item("5", "Agatha Christie")); list.add(Item("6", "Jonathan Franzen")); list.add(Item("7", "Maya Angelou")); list.add(Item("8", "Sarah Waters")); list.add(Item("9", "Jules Verne")); list.add(Item("10", "Naomi Klein")); list.add(Item("11", "Paula Hawkins")); list.add(Item("12", "Philip Roth")); return list; } } |
Note: We return the cached items if available. In a real world web app, depending on the domain of your web app, you may want to either invalidate the cache after x minutes (eg for a small merchandise store), or use a backend with server side events functionality such as Firebase (eg for a chat app).
We could directly inject the Service into ListComponent. However, in a real web app, you may have other components that need access to the items. So we inject it in the AppComponent, the parent of all components, and then access that instance from the ListComponent.
|
1 2 3 4 5 6 7 8 9 10 11 12 13 14 |
[...] import 'package:AngularDartFilterList/src/data/items_service.dart'; [...] @Component( selector: 'my-app', styleUrls: ['app_component.css'], templateUrl: 'app_component.html', directives: [ListComponent], providers: [ClassProvider(ItemsService)], ) [...] |
|
1 2 3 4 5 6 7 8 9 10 11 12 |
import 'package:angular/angular.dart'; import 'package:AngularDartFilterList/src/data/items_service.dart'; [...] class ListComponent implements OnInit { ItemsService _itemsService; ListComponent(this._itemsService); [...] } |
Displaying the list
We load the list of items in the component, so we can refer to it from the template.
|
1 2 3 4 5 6 7 8 9 10 11 12 13 14 15 16 17 18 19 |
[...] import 'package:AngularDartFilterList/src/data/item.dart'; [...] class ListComponent implements OnInit { ItemsService _itemsService; List<Item> items; ListComponent(this._itemsService); @override void ngOnInit() async { items = await _itemsService.getItems(); } } |
We can now use items in the template. We combine it with *ngIf and *ngFor to implement 3 different UI states: “loading”, list of items, and “empty list”. So let’s replace the placeholder div list_component.html with the code below.
|
1 2 3 4 5 6 7 8 9 10 11 12 13 14 15 16 |
<div *ngIf="items == null" style="text-align: center"> Loading items... </div> <div *ngIf="items != null"> <ul class="items" *ngIf="items.length > 0"> <li *ngFor="let item of items"> <div class="item">{{item.display}}</div> </li> </ul> <div *ngIf="items.length == 0" style="text-align: center"> No available items </div> </div> |
Finally, we apply a little bit of styling, in list_component.css. This tutorial isn’t about styling, so we keep it simple.
|
1 2 3 4 5 6 7 8 9 10 11 12 13 14 15 16 17 18 |
.items { margin-left: auto; margin-right: auto; list-style-type: none; padding: 0; width: 90%; } .items li { position: relative; background-color: #F7F7F7; margin: 2px; padding: 16px; border-radius: 0px; } .item { color: #333333; font-size: 1.2em; } |
Adding a user input field
We could add the user input field to the ListComponent. However, for a more complex UI, it would really bloat the ListComponent. Therefore, we use the architecture pattern of “a component per functionality”. The ListComponent shows a list of items, and the FilterComponent enables the user to specify what they are searching for.
We start with creating a filter folder under lib/src, and add 3 new files to it, for the filter component. The files are filter_component.css, filter_component.dart, and filter_component.html.
Then, we create the FilterComponent in filter_component.dart.
|
1 2 3 4 5 6 7 8 9 10 11 12 13 14 |
import 'package:angular/angular.dart'; @Component( selector: 'filter', templateUrl: 'filter_component.html', styleUrls: ['filter_component.css'], directives: [coreDirectives], ) class FilterComponent { void searchUpdated(String value) { // TODO } } |
The html in filter_component.html is an input field. As the user types, searchUpdated(String value) gets fired.
|
1 2 3 |
<div style="text-align: center;"> <input #searchInput (keyup)="searchUpdated(searchInput.value)" type="text" class="searchInput" id="searchInput" placeholder="Search through items..."> </div> |
We then amend app_component.dart and app_component.html to show the FilterComponent above the ListComponent.
|
1 2 3 4 5 6 7 8 9 10 11 12 13 |
[...] import 'package:AngularDartFilterList/src/filter/filter_component.dart'; [...] @Component( selector: 'my-app', styleUrls: ['app_component.css'], templateUrl: 'app_component.html', directives: [ListComponent, FilterComponent], providers: [ClassProvider(ItemsService)], ) [...] |
|
1 2 3 4 |
<h1>AngularDartFilterList</h1> <filter></filter> <my-list></my-list> |
Lastly, we style the user input in filter_component.css. This tutorial isn’t about styling, so we keep it simple.
|
1 2 3 4 5 6 |
.searchInput { width: 200px; padding: 8px; border: 1px solid #ddd; margin-bottom: 24px; } |
Interaction between FilterComponent and ListComponent
To communicate between ListComponent and FilterComponent, which are siblings and not parent/child, we will use a broadcast stream in a service. The service will be injected into the parent of both siblings, so the siblings can access it. The ListComponent will subscribe to the event stream. Each time the input value changes, the current input value is added to the stream.
We start with creating filter_service.dart in lib/src/filter. It has a broadcast stream of strings, corresponding to the value in the user input field.
|
1 2 3 4 5 6 7 8 9 10 11 12 13 14 15 |
import 'dart:async'; class FilterService { StreamController<String> _filterValueEvents = StreamController.broadcast<String>(); void updateSearch(String str) async { _filterValueEvents.add(str); } Stream<String> getFilterEvents() { return _filterValueEvents.stream; } } |
Then, we inject it in app_component.dart.
|
1 2 3 4 5 6 7 8 9 10 11 12 13 |
[...] import 'package:AngularDartFilterList/src/filter/filter_service.dart'; [...] @Component( selector: 'my-app', styleUrls: ['app_component.css'], templateUrl: 'app_component.html', directives: [ListComponent, FilterComponent], providers: [ClassProvider(ItemsService), ClassProvider(FilterService)], ) [...] |
Now that it is injected in AppCompoment, we can access it in the 2 child components, FilterCompoment and ListComponent. In FilterCompoment, we add an event to the Stream each time the input field value is updated; in ListCompoment, we listen to the stream.
|
1 2 3 4 5 6 7 8 9 10 11 12 13 14 |
import 'package:angular/angular.dart'; import 'package:AngularDartFilterList/src/filter/filter_service.dart'; [...] class FilterComponent { FilterService _filterService; FilterComponent(this._filterService); void searchUpdated(String value) { _filterService.updateSearch(value); } } |
|
1 2 3 4 5 6 7 8 9 10 11 12 13 14 15 16 17 18 19 20 21 22 23 24 25 |
[...] import 'package:AngularDartFilterList/src/filter/filter_service.dart'; [...] class ListComponent implements OnInit { ItemsService _itemsService; FilterService _filterService; List<Item> items; ListComponent(this._itemsService, this._filterService); @override void ngOnInit() async { items = await _itemsService.getItems(); _filterService.getFilterEvents().listen((filterValue) async { // TODO }); } } |
Filtering the list data
We now add the filter string as an argument to the getItems() method in ItemsService, and create an internal method to filter the cached list of items.
|
1 2 3 4 5 6 7 8 9 10 11 12 13 14 15 16 17 18 19 20 21 22 23 24 25 26 27 28 29 30 31 32 33 34 35 |
[...] class ItemsService { List<Item> _items; Future<List<Item>> getItems(String filter) async { [...] if (_items != null) { return _filterCachedItems(filter); } [...] return _filterCachedItems(filter); } List<Item> _filterCachedItems(String filter) { if (filter == '') { return _items; } List<Item> list = List<Item>(); for (var item in _items) { if (item.display.toLowerCase().contains(filter.toLowerCase())) { list.add(item); } } return list; } [...] } |
We can now call this new method from ListCompoment.
|
1 2 3 4 5 6 7 8 9 10 11 12 13 14 |
[...] class ListComponent implements OnInit { [...] @override void ngOnInit() async { _filterService.getFilterEvents().listen((filterValue) async { items = await _itemsService.getItems(filterValue); }); items = await _itemsService.getItems(''); } } |
Clearing the user input
To allow the user to clear the input field, we add an image. On click, we both clear the UI and notify FilterCompoment that the new value for the filter is an empty string.
Download cancel_icon.png and save it in web folder. Now, we can amend the FilterCompoment template to include it.
|
1 2 3 4 |
<div style="text-align: center;"> <input #searchInput (keyup)="searchUpdated(searchInput.value)" type="text" class="searchInput" id="searchInput" placeholder="Search through items..."> <img src="cancel_icon.png" (click)="searchUpdated('');searchInput.value=''" class="cancelImg" alt="Reset search field"/> </div> |
Lastly, we style the clear image in filter_component.css. This tutorial isn’t about styling, so we keep it simple.
|
1 2 3 4 5 6 |
[...] .cancelImg { width: 32px; height: 32px; vertical-align: middle; } |
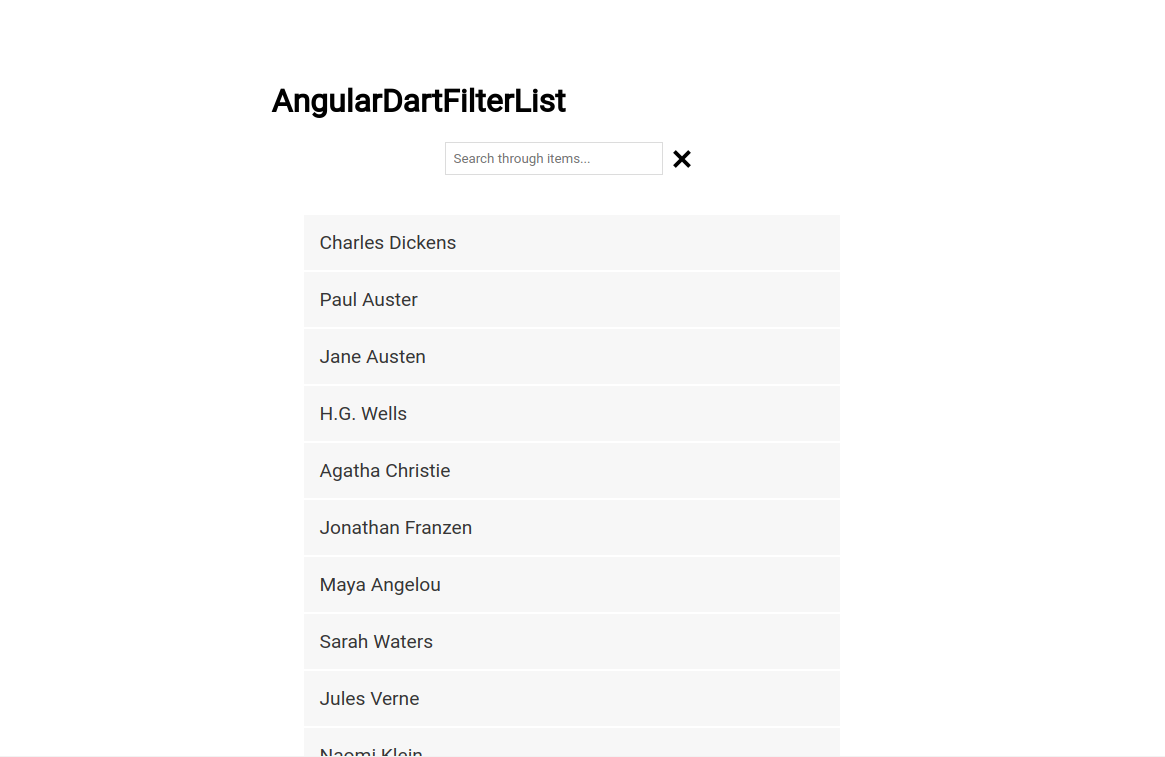
Voila!
What next?
In this tutorial, we mocked getting the data. For more information on actually getting data from a server, check out the official doc on fetching data dynamically.

Mobile app developer with 14 years experience. Started with the Android SDK in 2010 and switched to Flutter in 2017. Past apps range from start ups to large tech (Google) and non tech (British Airways) companies, in various sectors (transport, commercial operations, e-commerce).